When the Angular components are created, they enter their lifecycle and remain when they are destroyed. Angular Lifecycle hooks are used to check the phases and trigger changes at specific phases during the entire duration.
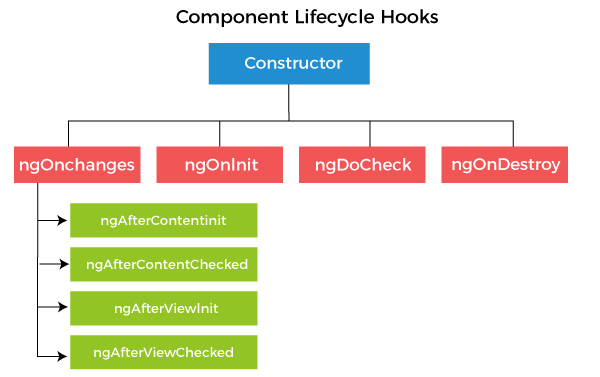
ngOnChanges( ): This method is called when one or more input properties of the component are changed. The hook receives a SimpleChanges object containing the previous and current values of the property.
ngOnInit( ): This is the second lifecycle hook. It is called once, after the ngOnChanges hook. It is used to initialize the component and sets the input properties of the component.
ngDoCheck( ): This hook is called after ngOnChanges and ngOnInit and is used to detect and act on changes that Angular cannot detect. In this hook, we can implement our change detection algorithm.
ngAfterContentInit( ): This hook is called after the first ngDoCheck hook. This hook responds after the content gets projected inside the component.
ngAfterContentChecked( ): This hook is called after ngAfterContentInit and every subsequent ngDoCheck. It responds after the projected content is checked.
ngAfterViewInit( ): This hook is called after a component’s view or initializing a child component’s view.
ngAfterViewChecked( ): This hook is called after ngAfterViewInit. It responds after the component’s view or when the child component’s view is checked.
ngOnDestroy( ): This hook is called just before Angular destroys the component. This is used to clean up the code and detach event handlers.
In the above hooks we have described, the ngOnInit hook is the most often used hook. Let’s see how to use the ngOnInit hook. If you have to process a lot of data during component creation, it’s better to do it inside the ngOnInit hook rather than the constructor:
See the example:
- import { Component, OnInit } from ‘@angular/core’;
- @Component({
- selector: ‘app-test’,
- templateUrl: ‘./test.component.html’,
- styleUrls: [‘./test.component.css’]
- })
- export class TestComponent implements OnInit {
- constructor() { }
- ngOnInit() {
- this.processData();
- }
- processData(){
- // Do something..
- }
- }
In the above code, you can see that we have imported OnInit, but we have used the ngOnInit function. This is how we can use the rest of the hooks as well.